skip to main |
skip to sidebar
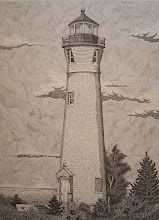
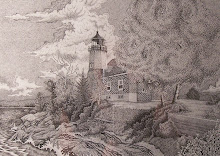
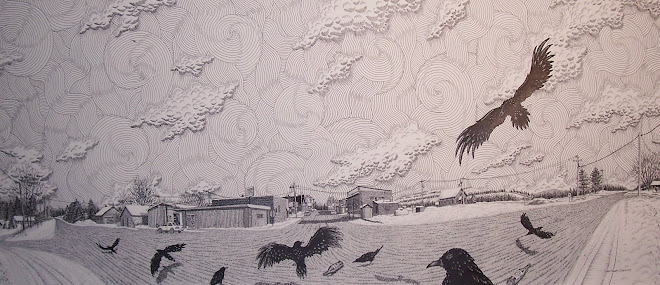
 Now we will begin on the walls of the buildings and the techniques used. You will have to be the judge of how dark or light you want to create them but remember that after I have finished the initial stippling the create the tone and texture you are looking for you have to keep in mind that you will have to come back into the same walls and add more texture and life to it so just always keep this in mind. If you add to much stippling or create it to tightly it will just make the walls far to dark or limit the texture you can add later which will affect the overall piece dramatically.
To begin the walls on either of the subjects I first decide how dark and rich I want to make each building, what is the subject I want to concentrate on and make that the thing in which everything else will flow into. Study each building in each sample photo I post. You will be amazed by how much you will actually pick up just by studying what I am providing on each post. Now once you have decided on how the piece shall work out begin stippling whichever building you want the most attention on and stippling in by using the .25 mm pen. Complete the entire building and make sure you keep the stippling uniform. Now the buildings will take at least two to three posts so just get the stippling completed o each building making sure that each will have either more tightly placed stippling or loose stippling. I’ll cover details such as cracking in the siding along each building and hw to create any shadows falling along them.
I also will be posting my lesson blogs on Facebook…but since I cannot actually remember the site address just go to Facebook and search “Stacy Vaughn Davis”…you should be able to find me but if not let me know.
http://profiles.yahoo.com/stacyvaughn68
www.stacyvaughndavis.blogspot.com
www.flickr.com/stacyvaughn68
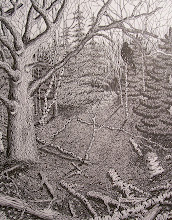
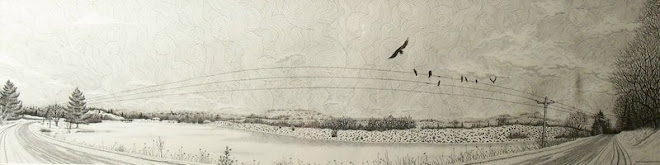
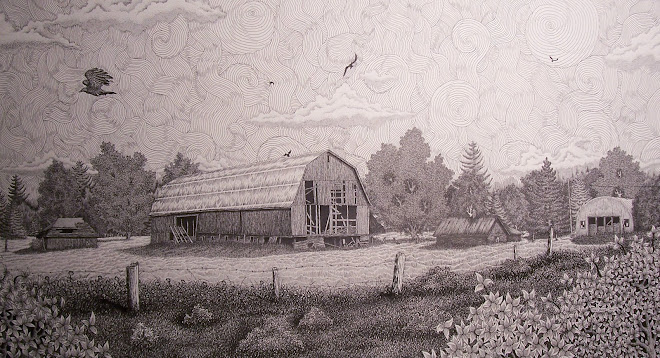
 When I begin detailing the tree and surrounding foliage I first will decide which ones will be the prominent and those that will look detailed but in actuality there is very little detail involved. I began working on the tree closest to me using my .30 mm pen and using the techniques I have previously went over (refer to flickr account and look for the tree’s and foliage worksheet) and I complete that tree first. I then move on to the second most prominent, the third and so forth. If you’ll notice on the second prominent tree I have used very small circles tightly bunched together. This technique offers a great texture for tree’s that you want to indicate some detail but you do not want to overpower the more prominent tree’s. Once I completed all the circles I then just over it again using my .25 mm pen and just scribble in some shading in the leaves themselves. For the most prominent tree to my right I only shade near the visible branches using the cross hatching technique. This will be the ONLY tree using the cross hatching technique because of the fact that when you are trying to convey foliage which in and of itself has absolutely no straight lines using cross hatching to much will leave the piece looking very two dimensional…try and avoid this as much as possible unless you give each line a slight curve and this can be difficult not only in the hours it will add to your work but cross hatching in foliage can go very wrong very fast …use this technique ONLY when you feel completely comfortable with your pens.
Practice on some scrap paper all the different tree and foliage techniques and see what most fits your ability at this time. Get these completed and I’ll cover the distant foliage and also the beach sand. Any questions email me and I’ll get back to you asap.
www.flickr.com/stacyvaughn68
www.blogspot.com/stacyvaughndavis
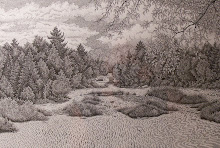
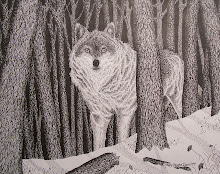
 When you are doing your initial sketch only sketch out what you need to see. Don’t go overboard sketching out every little detail such as the blades of grass or the leaves or any other detail that you will just basically go over again anyways. It may help you in some areas but what you will soon learn if you do that consistently is that it really is a waste of time and effort. There are pieces I have created that have so much stippling in it that I have blisters in between my fingers…if I tried to do this with every piece I would be literally unable to complete more than five to six pieces a year if I were that lucky…KEEP IT SIMPLE…it’s a sketch!
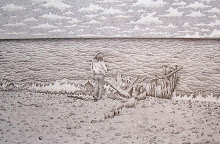
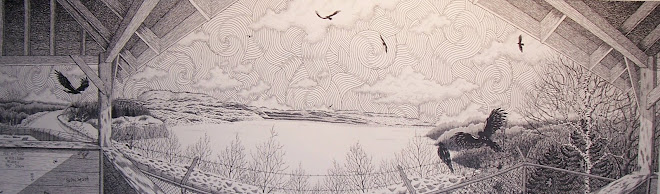
I first want to get a feel for the piece I am working on and to do that in this piece I began laying ink to the birch tree directly to “my” right. I use my .30 mm pen and just ink in a few of the leaves there…just to give me a feel of how the depth of the tree line as it progresses towards the distant Marquette lighthouse. I choose several of the tree’s that will be the dominant foliage. These are the ones I will apply detail as opposed to those making up the distant tree line. As I work my way back I drop down to my .25 mm pen. Once you do just a bit of each this will help you keep in mind of how heavy you want to apply the ink or how lightly. I then just finish those prominent tree’s for now.
This should take you all about three to five days so I’ll go over so get your sketch worked out and I’ll go over detailing the leaves and foliage in next post. Any questions just ask!
www.flickr.com/stacyvaughn68
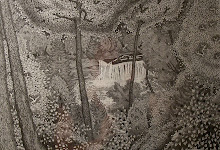
 First my apologies for the two month hiatus but I have a solo show in May 2009 and I am concentrating on more surreal realist works. This is the next piece I will be breaking down in steps for you all. This piece is titled: “Uh Oh!…who’s judging who? , Pen and Ink/Conte Pencil , 24 inch x 36 inch , $3000.00USD.
This piece is now on exhibit at the Oasis Gallery, 130 W. Washington Street (Masonic Building), Marquette, Michigan 49855 in their annual Donor’s Show 2009. A reception will take place on February 20th at 7-9pm. Which will coincide with the Sled dog races that begin in Marquette. That doesn’t mean I will be there but can be upon request…I so hate crowds of people. But I will try and be there if I can convince myself too : ) So please go and enjoy the exhibit, it runs from February 1st thru the 28th and most importantly support your local artist’s and galleries!
Now back to the piece. We will go over every step and technique I used to create this piece and for you more advanced I expect you to be able to super impose yourselves onto whatever similar piece you choose so get your equipment ready and stretch those fingers…time to get them incredibly sore! I will make sure to post the lessons each week at least until mid April when I may have to take another two week hiatus because will be getting works delivered to The Kerredge Gallery in Hancock for the May show so until next post get your subject ready and your table set up!
www.flickr.com/stacyvaughn68
http://360.yahoo.com/stacyvaughn68